CenterPoint Accounting
- Backup and/or Restore a Single User Database
Backup and Restore Video - Duration: 7 min 24 sec
_24.jpg)
| Document #: | 3022 | Product: | CenterPoint® |
|---|
Use this procedure to back up your accounting and/or payroll data onto a hard drive, zip drive, flash drive or tape drive. To copy the backed up files to the CenterPoint system, use the Restore feature. If you have payroll and accounting in the same database, the backup process will backup all data.
Backing up your CenterPoint data is one of the most important, yet also one of the most neglected areas of computing.
It is recommended that you backup as often as you feel comfortable with having to recreate the data if something fails.
If you are using CenterPoint in a multi-user (network) environment, please refer to the Backup a Network Database document.
To restore a database back to the data included in a CenterPoint Backup, following the Restore a Backup instructions at the end of this document.
Backup a Single User Database
- On the File menu, select Backup Database.
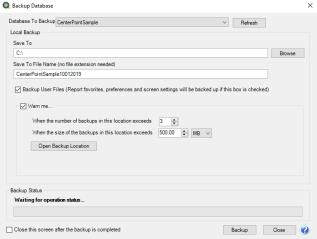
- In the Database To Backup box, select the database that you want to backup. The database that is currently open will automatically display.
- In the Save To box, a default path displays. Click Browse, and then select the location on your own computer to save the backup file. Once you select the path to backup to, the last path used for backing up will automatically display each time you backup.
- To backup to your own computer, select a location on the C:\ drive.
- To backup to a server or remote computer, select a location on the network drive (for example, f:\ or g:\, etc.).
- To backup to a flash (thumb) drive, select the drive letter that was assigned to the drive when it was inserted into the usb port on the computer.
- If you want to back up your screen settings, report favorites, and database preferences so they are available to restore if needed, leave the Back Up User Files check box selected. This option will prevent you from redefining your specific user files, favorites, and database preferences if a restore is necessary. If you always want this check box selected, right-click on the Back Up User Files check box and select Set As Default.
- If you want to be warned when the Save To backup location you are storing backups to exceeds a specified number of files or amount of space, leave the Warn Me check box selected. When the check box is selected, and then specify the conditions about when you want to be warned:
- In the When the number of backups in this location exceed box, enter a number between 0 - 99.
- In the When the size of the backups in this location exceeds box, enter a number between 0.00- 999.99 and select either MB (megabyte) or GB (gigabyte)
- Setting either value to 0 disables that specific warning. For example, setting the When the number of backups in this location exceed box to zero will not warn you about the number of backups, but you will continue to be warned about the size of the backups according to your When the size of the backups in this location exceeds setting.
- To view the contents of the Save To backup location, click Open Backup Location.
- If you want to Close this screen when the backup completed, select this check box.
- Click Backup.
- At the Backup Completed Successfully message, click OK.
Tip: Define a Preference that will automatically display the Backup screen each time you exit CenterPoint (just as if you selected File > Backup Database). To set the Backup preference:
- Select File > Preferences > General.
- Select Backup.
- Under Backup, in the Backup on Exit box, select Yes.
If you are backing up a database on a CD or DVD-RW Drive
- Use the procedure above to back up the data to a location on your hard drive. Note the location you are backing up to.
- From your Desktop, double-click the My Computer icon.
- Browse to the folder that you backed up the database to.
- Right-click on the backup file and select Send To and then select the CD drive. The message, You have files waiting to be written to the CD will display.
- From your Desktop, double-click the My Computer icon.
- Double-click the CD or DVD-RW drive. The screen will display the file(s) ready to be written to the CD or DVD-RW drive.
- Select File > Write These Files to CD.
- A CD Writing Wizard will display that will guide you through the remainder of the process by following the on-screen instructions.
Restore a Single User Backup
If the original data on your hard disk is accidentally erased, overwritten, or becomes inaccessible because of a hard disk malfunction, you can restore the data from a CenterPoint backup using the restore process. The restore process will revert all data back to the point when the backup was completed. All data that's been entered in CenterPoint since that backup was completed will be lost.
Use this procedure to restore a back up of your single-user accounting and/or payroll data from a workstation. If you have payroll and accounting in the same database, the restore process will restore all data back to the point the backup was completed. All existing data for the selected database will be overwritten during the restore process.
- On the File menu, click Restore Database.

- In the Backup File To Restore box, select the file you want to restore. Click Browse to locate the backup file (for example, from a CD or another hard drive). The file name for the backup file is "databasename.cpz".
- In the Database To Restore box, the database name that the backup file will be restored to will display.
- In the Restore Databases Path box, the path that the backup file will be restored to will display.
- In the Server box, select the server where your database should be restored. If your database is local, typically, it is recommended that the default local\(RWS)server be accepted in this box.
- If you selected to restore a database that had the Back Up User Files option selected when the back up was performed, all of the user files will display. Please review the items that are included in the back up. It is important to note that if you are restoring from a source other than your original database, (for example your Accountant or Service Bureau backed up data and are now having you restore the data) that the selected items will be overwritten with their settings for reports, preferences, and screen settings unless you unselect the items you do not want to restore.
- Click Restore.
- At the You are trying to restore database "Databasename" If the database exists, all the current data will be overwritten with the restore database's data and cannot be retrieved. Do you want to continue? message, click Yes to continue restoring the database, or click No to cancel the restore procedure.
- At the Restore Completed Successfully message, click OK. The Restore Database screen will close automatically.